Mastering OneDrive for Business can greatly enhance your daily productivity and in our two-part series, we’ll review four features power users need to know about OneDrive. In Part 1 of our series, we covered File Syncing. Mastering OneDrive for Business Part 2 covers file collaboration and access controls, mobile access, and Office integration.
In part 1, we defined the starting point and the system configuration for our examples, so be sure to review the setup before continuing.
Feature: Collaboration and Access Controls
OneDrive enables users to collaborate on documents in real-time with co-workers or external partners and also provides version control for tracking changes. OneDrive also has a range of access controls, including sharing links that can be set to expire or require password protection.
Table of Contents
Sharing Files
After synchronizing files, sharing files is the next most popular feature of OneDrive. Let’s Share!
- There are several ways to share files via OneDrive, but the easiest way to share them is through the web interface. Open your browser and log into the web interface from https://login.microsoftonline.com.
- Navigate to the OneDrive application. It can be found under the “waffle” tile (nine small dots) located in the upper left corner.
- Click on My Files. You’ll see a listing of your files and folders.
- Find the file you want to share.
- Right click on the file and select Share or click the three dots.
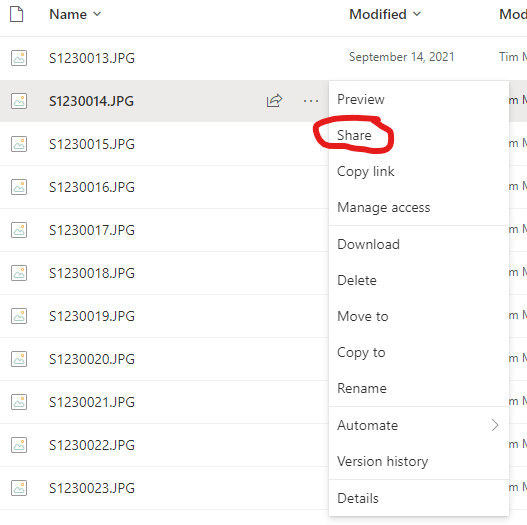
One Drive File Sharing Menu Popup
- There is a lot of information in the Send link dialog box.
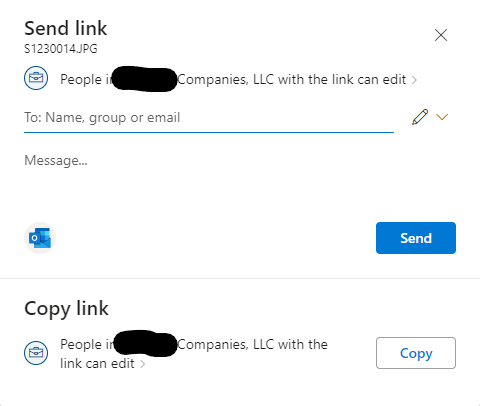
OneDrive Send Link Dialog
Let’s unpack it.
- The name of the file you are sharing is located near the top of the dialog box
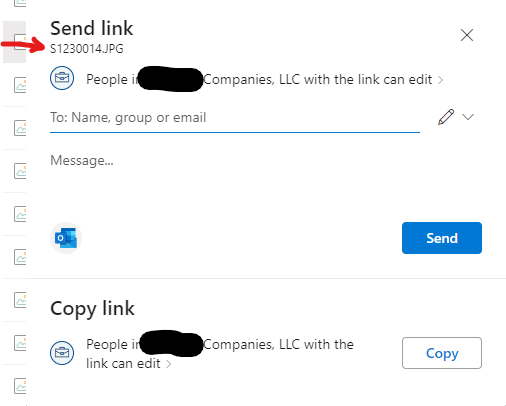
OneDrive File Sharing Fine Name
- Just under the name of the file is a sharing statement with a right carat. Click on the sharing statement for sharing options. (Note: your system administrator has set this default for the entire company, and some of the sharing options may not be available in your organization).
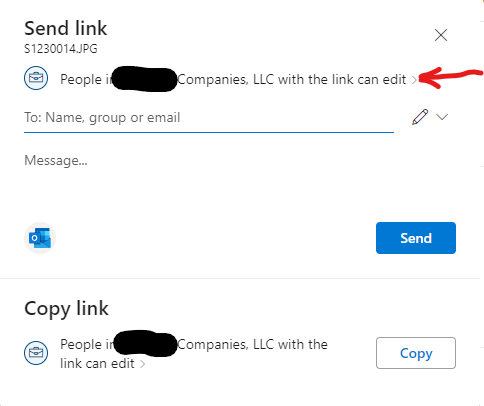
OneDrive File Send Dialog Sharing Options
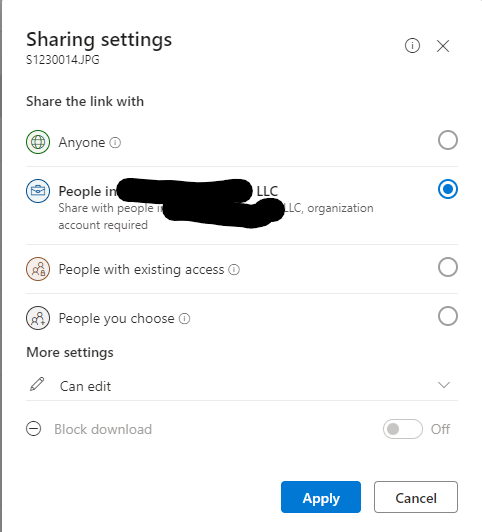
- Select the type of sharing you want with this file.
OneDrive Sharing Settings
There is a small informational (i) tip next to each selection to give you more information about that selection.
OneDrive Sharing Settings More Settings
- Anyone is just that. You send a link to anyone, and they can read the file. For security reasons we don’t recommend this, but it can useful for short periods of time.
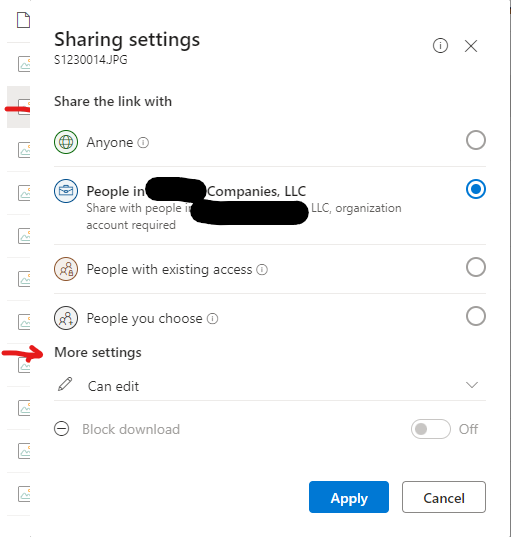
- When you select the radio button, more settings appear at the bottom of the screen. We recommend you set expiration dates on all shares. You can optionally set a password and block downloads. Remember that anyone can read the file, display it on their screen, and then do screen shots or photographs of the screen, so blocking downloads control databases, but not images or PowerPoint files.
- People in your company. Only people in your organization can read the file.
- People with existing access. Use this to re-share after a link if the recipient has lost the link.
- People you choose. You can choose to share with both internal and/or external people.
- Anyone is just that. You send a link to anyone, and they can read the file. For security reasons we don’t recommend this, but it can useful for short periods of time.
- The name of the file you are sharing is located near the top of the dialog box
Click Apply to return to the sharing screen.
- If you chose to email a notification to the recipient, enter their email address. By default it creates a new Outlook message.
- Power User Tip: Many organizations block inbound OneDrive file sharing links (sent via email) by policy. You may have to send it to the recipient via alternate methods if you are sending a sharing link outside of your organization.
- You can set the sharing options on a file but not send an email by just copying the link. You can then share the link via any method you choose.
- Don’t forget to timeout every share! This is a best practice and keeps access to files from the outside at a minimum.
Power User Tips on Sharing Files
- You can also share directly from Windows File Explorer by right-clicking on the file you want to share (it needs to be in OneDrive in order for this to work). The same file sharing prompt will appear as the web interface.
- You can check on the status of a shared file from the web interface by clicking on Shared in the left column. This displays files you have shared out and files shared with you. You can remove items from this display by clicking on the three dots next to the name.
- OneDrive Online (web) always has a list of recently used files. This is handy if you are looking for something and don’t want to dig through a folder structure to find it.
Feature: Mobile Access
OneDrive has mobile apps that enable you to access files from smartphones, tablets, and web browsers, making it easier to work on the go. There is a version of OneDrive for iOS (Apple), Mac, Windows, and Android. Web versions support Edge, Chrome, Firefox, and Safari.
Power User Tips for Mobile Access
- Use the mobile tools on your phone or tablet for looking up data. Edit data using the web or desktop editions of the software. Doing it this way will reduce data entry errors or strange formatting.
- You can sync files to the mobile OneDrive client so you can review materials when not connected the Internet (such as on a flight). This is handy for reading PDF files and doing markup on them. Once you are back on the Internet, the marked-up files are synced back to OneDrive.
Feature: Integration with Microsoft Office
OneDrive integrates with Microsoft Office apps, such as Word, Excel, and PowerPoint, making it easier to edit and share documents. Not only is OneDrive compatible with the Office apps, it is fully embedded into the Office apps making editing and collaboration easy.
For instance, let’s say you want to use OneDrive features in Word.
- Log into Word by clicking on File -> Account. Login with your Office365 credentials.
- Once you are logged in, OneDrive automatically connects to Word.
- File -> Open will automatically show both local files and OneDrive files.
- Same goes for saving files. You can save directly to OneDrive.
- If you are editing a file located in OneDrive, Word defaults to auto-saving. You can optionally turn this feature on and off for each file you edit

Word Auto Save Option
- You can share the document you are editing by clicking on File->Share and the same sharing dialog box (see above) will appear.
- On the desktop editions of Microsoft Office, note that you can’t save to a folder which you have decided to not sync with the device you are working from. Even though Office applications know how to use OneDrive, they are limited by your selections. Online editions of Office don’t have this limitation.
Office Integration Power Tips
- You can control the way file collaboration works in OneDrive by opening the OneDrive settings (left click on the OneDrive icon –> Settings). Under Sync and backup on the left, click on Advanced settings. Under File collaboration, you can turn on or off file collaboration and select how to deal with file conflicts (if two users make a change at the same time).
We hope our Mastering OneDrive for Business series has helped you become more confident in using OneDrive. Need help rolling out OneDrive to your users? As always, we’re here to help.


 Published: February 9, 2023