Looking to make your day in Microsoft Outlook more pleasurable? We’ve got 5 Outlook power tips to help you along. These tips assume you:
- Are a subscriber to Office 365 or Microsoft 365
- Are on the most recent version of Outlook
- Are using the PC desktop version of Outlook
- These tips may work on the upcoming new version of desktop Outlook, but the navigation and naming of steps may not work.
Tip 1: Create a Contact Group
Creating a contact group to handle emailing several colleagues or sending out meeting invitations is a time-saver. To create a contact group:
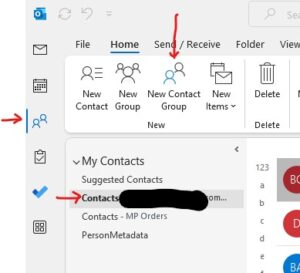
- Make sure you are in the People view.

- Click on the Home tab.
- Under My Contacts, select the folder where you want to save this group. We recommend saving it under the folder called Contacts (youremail@company.com).
- Select New Contact Group.
- Name your group in the top line.
- Click Add Members, and then add people from your address book or Outlook contacts list. If the email address is not listed in either of these, you will have to add the email address as a contact, then add it to the group.
- Once you have added all members of the group, click Save & Close. The next time you want to send an email to this group, select the group by clicking on the to: button and the contact listing will open. Under Address Book: select Contacts – youremailaddress@company.com and then your group will be listed among the names in the list.
Pro Tip: You can use the group for both emails and scheduling meetings.
Tip 2: Create a Quick Step
You can automate part of your workday in Outlook by creating Quick Steps. This versatile tool helps automate repetitive tasks and simplifies email organization, enabling you to be more efficient in your daily communications.
What are Quick Steps? Quick Steps are customizable, one-click actions that automate common email tasks in Microsoft Outlook. They can be tailored to your specific needs, allowing you to streamline your workflow and save time by performing multiple actions at once. Some examples of tasks you can automate with Quick Steps include moving emails to specific folders, categorizing messages, and creating pre-written replies.
How to turn on Quick Steps: Quick Steps are already built into Outlook, so there’s no need to enable them. To access Quick Steps, follow these simple steps:
- Open Microsoft Outlook.
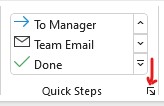
- Click on the “Home” tab in the Ribbon (the toolbar at the top of the screen).
- Locate the “Quick Steps” section in the middle of the Ribbon.

From here, you can create, modify, and use Quick Steps to optimize your email management.
Use Cases: To give you a better understanding of how Quick Steps can benefit your daily workflow, here are some practical use cases:
- Move to Folder: If you frequently move emails to specific folders for an organization, create a Quick Step to move selected emails to a particular folder with just one click. This can be especially useful if you have a folder structure for different projects or clients.
- Categorize and Move: Suppose you want to label emails with a specific category and move them to a folder simultaneously. In that case, you can create a Quick Step that applies a chosen category and moves the email to a designated folder in one action.
- Team Email: If you often send emails to the same group of people, such as your team or department, create a Quick Step that opens a new email with the recipients already populated. This can save you time when sending regular updates or announcements.
- Reply and Delete: If you receive many emails that only require a short, standard response, create a Quick Step that sends a pre-written reply and deletes the original email. This can help you maintain a clean inbox while efficiently handling repetitive queries.
Start experimenting with Quick Steps today and discover how this feature can transform your Outlook experience.
Tip 3: Dictate an Email
Did you know you can dictate emails? This powerful tool allows you to compose emails using your voice, eliminating the need for typing and helping you communicate more efficiently. In this section, we will explore the Dictation feature, how to use it, and provide some practical use cases to help you maximize its potential.
What is Dictation? Dictation is a speech-to-text feature in Microsoft Outlook that enables you to compose emails by speaking into your device’s microphone. This tool leverages advanced speech recognition technology to accurately convert your spoken words into written text. Whether you want to draft a quick email or create a detailed message, Dictation can help you achieve your goal more efficiently.
To use the Dictation feature in Outlook, follow these simple steps:
- Open Microsoft Outlook.
- Click “New Email” to compose a new message.
- In the “Message” window, click on the “Dictate” icon in the toolbar (it looks like a microphone).

- When the Dictate icon turns red, start speaking into your device’s microphone. As you speak, your words will be transcribed into the email body in real-time.
- When you finish dictating, click the Dictate icon again to turn off the feature.
- Review and edit your email as needed, then send it as usual.
Outlook Dictation can be beneficial in various scenarios, including:
- Hands-Free Emailing: If you’re multitasking or have limited use of your hands, Dictation allows you to compose emails without needing to type. This can be especially helpful when you’re on the go or working in a hands-on environment.
- Faster Communication: Dictation can help you draft emails more quickly, as speaking is often faster than typing. This can be especially useful when you have a high volume of emails to send or need to respond to urgent messages.
- Accessibility: For individuals with mobility or dexterity challenges, Dictation provides an alternative method for composing emails, making Outlook more accessible and user-friendly.
- Reducing Typing Strain: Prolonged typing can lead to strain or discomfort, especially for those with repetitive strain injuries (RSIs) or carpal tunnel syndrome. Dictation offers a break from typing, reducing the risk of strain-related issues.
Tip 4: Use a Search Folder
One powerful feature that can help you stay on top of your inbox and quickly access relevant emails is the Search Folder.
What is a Search Folder? A Search Folder in Outlook is a virtual folder that displays a collection of emails based on specific search criteria. Unlike regular folders, Search Folders don’t store emails directly. Instead, they display emails from various folders in your mailbox that meet the defined search criteria. This enables you to easily locate and access relevant emails without having to manually search through your entire inbox.
To create a Search Folder in Outlook, follow these steps:
- Open Microsoft Outlook.
- In the Folder pane, right-click on “Search Folders” and select “New Search Folder.”
- In the “New Search Folder” window, choose a predefined search criteria or create a custom one by selecting “Create a custom Search Folder” and clicking “Choose.”

- Set the desired criteria and click “OK” to create your Search Folder.
Search Folders can be incredibly useful in various situations, such as:
- Unread Emails: Create a Search Folder to display all unread emails from different folders in one place, making it easier to keep track of and respond to new messages.
- Flagged Messages: If you often flag emails for follow-up, create a Search Folder that displays all flagged messages across your mailbox. This can help you stay on top of your tasks and ensure that no important emails are overlooked.
- Emails from Specific People: If you frequently communicate with certain individuals or teams, create a Search Folder that displays emails from specific senders. This can help you quickly access relevant correspondence and stay organized.
- Emails with Attachments: If you often receive emails with attachments, create a Search Folder that displays all messages with attachments. This can make it easier to locate important files and keep track of documents shared via email.
- Date-Based Organization: Create a Search Folder that displays emails received within a specific date range, such as the past week or month. This can help you stay organized and ensure that you’re addressing recent correspondence in a timely manner.
Start experimenting with Search Folders today and discover how this feature can enhance your Outlook experience.
Tip 5: Create a Poll
You can add a poll directly to an email. Who knew!
When you’re working with a team, making decisions or gathering opinions can sometimes be a time-consuming process. Outlook offers a convenient solution to this challenge with the Polls feature. This tool allows you to create and share polls within your emails, streamlining the decision-making process and helping you collect valuable insights.
To create a poll in Outlook, follow these simple steps:
- Open Microsoft Outlook and create a new email.
- In the “Message” window, click the “Insert” tab in the Ribbon (the toolbar at the top of the screen).
- Locate and click the “Poll” button. If you don’t see the Poll button, make sure you’re using a supported version of Outlook, such as Outlook for Microsoft 365 or Outlook 2021.
- A new window will appear, allowing you to create your poll. Enter your poll question in the “Ask a question” field and provide answer options in the spaces provided. Click the “+” button to add more answer options, if needed.
- Once you’ve finished creating your poll, click “Insert poll into email.” The poll will be added to your email as a card.
- Complete your email by adding recipients, a subject line, and any additional content, then click “Send.”
When recipients respond to your poll, you’ll receive their answers as an aggregated summary, making it easy to analyze the results and make informed decisions.
The Polls feature in Outlook can be utilized in various scenarios, including:
- Meeting Times: When scheduling a meeting or event, create a poll to gather participants’ availability. This can help you identify the most suitable time for most attendees and streamline the scheduling process.
- Decision-Making: If your team needs to decide on a specific topic, such as choosing between project options or selecting a design, create a poll to gather input and opinions. This can help expedite the decision-making process and ensure everyone’s voice is heard.
- Event Planning: When planning an event or team-building activity, use a poll to gather preferences on activities, venues, or dates. This can help you tailor the event to your team’s interests and ensure maximum participation.
- Feedback Collection: If you’re seeking feedback on a presentation, report, or project, create a poll to collect input on specific aspects, such as clarity, content, or format. This can help you identify areas for improvement and gather valuable insights from your team.
Is your IT provider struggling with providing the right answers to your organization’s Outlook problems? Maybe it’s time to explore a new IT provider. As always, we’re here to help.


 Published: February 16, 2023